How to create rich text WYSIWYG editor in React JS

The WYSIWYG text editor is a user interface that allows you to edit text and preview the result immediately. Building the rich text editor from scratch is a complicated and time-consuming task, hence external NPM packages such as “draft-js” and “react-draft-wysiwyg” will simplify the development process.

The React app will have the following features:

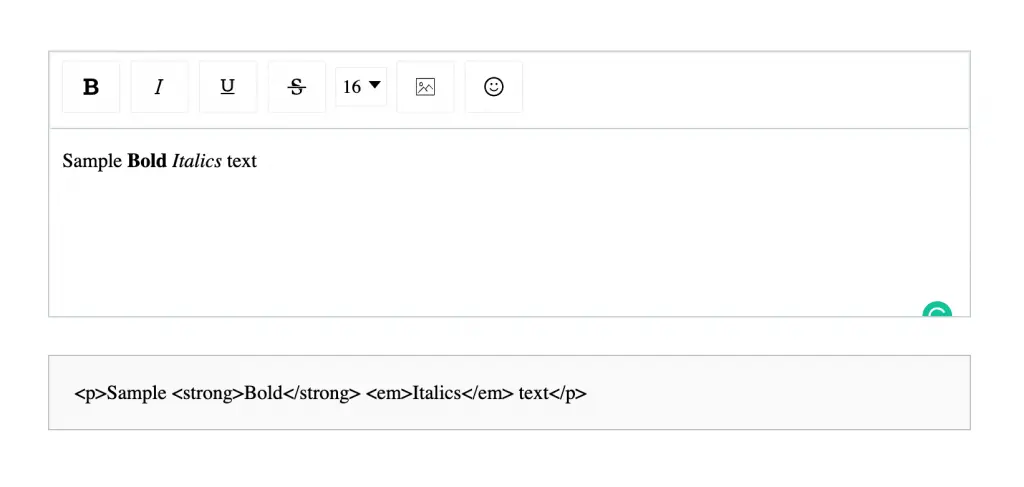
  1. Option to select the font size of the text between 8px to 30px.
  2. Include inline stylings such as bold, italics, underline and strikethrough.
  3. Feature to add emoji characters in the text.
  4. Allow users to embed images along with text characters.
  5. Display HTML code output of text editor content.
React WYSIWYG Rich text Editor
WYSIWYG editor in React JS

1) Install “draft-js”, “react-draft-wysiwyg and “draftjs-to-html” npm packages

  • react-draft-wysiwyg” package: Provides components to build customizable Wysiwyg editor with React JS and Draft JS.
  • Draft JS” package: It is a rich text editor framework for React JS and provides functionalities for the react-draft-wysiwyg package.
  • draftjs-to-html” package: Includes functionalities to parse raw “Draft JS” editor data into HTML code.
npm i draft-js react-draft-wysiwyg draftjs-to-html

// For projects configured with yarn 
yarn add draft-js react-draft-wysiwyg draftjs-to-html

2) React States to control editor content

The content of the text editor is dynamically updated by the user, hence React state is required to control the text editor content.

const [editorState, setEditorState] = useState(EditorState.createEmpty());

Additionally, handleChange function updates the state with “data” parameter on every function call.

const handleChange = (data) => {
  setEditorState(data);
};

3) Customize toolbar options

The default toolbar of the text editor from “react-daft-wysiwyg” package will display all the available options. We can customize the toolbar options based on the requirement through <Editor/> component props.

The tollbarOptions object is the customized value for toolbar property to display inline, font size, image, and emoji toolbar options.

const toolbarOptions = {
  options: ["inline", "fontSize", "image", "emoji"],
  inline: {
    options: ["bold", "italic", "underline", "strikethrough"],
  },
};

4) Include editor component into JSX code

The <Editor/> component imported from “react-draft-wysiwyg” package will render the WYSIWYG editor on screen, customized based on values passed through the props.

The CSS file imported from the library will include CSS styles for the editor.

import { Editor } from "react-draft-wysiwyg";
import "react-draft-wysiwyg/dist/react-draft-wysiwyg.css";
<Editor
  editorState={editorState}
  onEditorStateChange={handleChange}
  wrapperClassName="editor-wrapper"
  editorClassName="message-editor"
  toolbarClassName="message-toolbar"
  toolbar={toolbarOptions}
/>

5) Display HTML code output on the screen

The final step involves displaying output HTML code based on the editor content entered by the user. The “draftjs-to-html” package provides functionality to convert the editor content into HTML code.

import draftToHtml from "draftjs-to-html";

var htmlData = useMemo(
  () => draftToHtml(convertToRaw(editorState.getCurrentContent())),
  [editorState]
);
<div className="html-output">{htmlData}</div>

Final Solution Code

App.js

import React, { useState, useMemo } from "react";
import { EditorState, convertToRaw } from "draft-js";
import { Editor } from "react-draft-wysiwyg";
import draftToHtml from "draftjs-to-html";
import "react-draft-wysiwyg/dist/react-draft-wysiwyg.css";
import "./styles.css";

export default function App() {
  const [editorState, setEditorState] = useState(EditorState.createEmpty());
  const handleChange = (data) => {
    setEditorState(data);
  };
  var htmlData = useMemo(
    () => draftToHtml(convertToRaw(editorState.getCurrentContent())),
    [editorState]
  );

  const toolbarOptions = {
    options: ["inline", "fontSize", "image", "emoji"],
    inline: {
      options: ["bold", "italic", "underline", "strikethrough"],
    },
  };

  return (
    <div className="app">
      <Editor
        editorState={editorState}
        onEditorStateChange={handleChange}
        wrapperClassName="editor-wrapper"
        editorClassName="message-editor"
        toolbarClassName="message-toolbar"
        toolbar={toolbarOptions}
      />
      <div className="html-output">{htmlData}</div>
    </div>
  );
}

styles.css

.app {
  display: flex;
  flex-direction: column;
  padding: 10% 25%;
  margin-top: 20px;
  gap: 30px;
}
.editor-wrapper {
  border: 1px solid #c4cdd5;
}
.message-toolbar {
  border-bottom: 1px solid #c4cdd5;
  margin-bottom: 0px;
  padding: 6px 5px;
}
.message-editor {
  height: 150px;
  font-size: 16px;
  padding: 0px 10px;
}
.rdw-option-wrapper {
  min-width: 35px;
  height: 30px;
}
.html-output {
  border: 1px solid silver;
  padding: 20px;
  background-color: #fafafa;
}