In this article, you will learn how to create a list of items with input checkboxes using React JS. We build the list using controlled input checkbox input with React state.
Here we will consider an example of the checklist of items where users can check/uncheck items through the input checkbox. The list of functionalities are as follows:
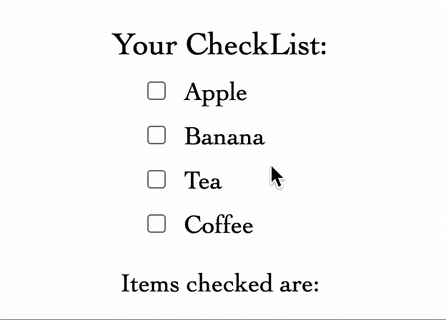
Display the list of items on the screen.
Check an item through the checkbox.
Uncheck an item through the checkbox.
Display text with a checked item that updates dynamically.
List of items with checkbox using React JS
1. Display list of items using Array.map()
The first step is to declare the list of the item names as an array of strings. Next, we will apply Array.map() on the checkList constant and return the JSX code with the item name in the callback function.
In order to add a checkbox for every item, we will include the HTML input of type=”checkbox” in the JSX code returned by the callback function of Array.map().
React State is declared to maintain the list of all checked items. The code is dynamically updated whenever “setChecked()” is called with the updated list as a parameter.
const [checked, setChecked] = useState([]);
4. Add and remove item from checked list
We will create a JS function to update the array based on the checkbox input with the following steps:
Create JS variable with a copy of the checked React state.
If the item is checked, a concatenated array of the existing array of items with the checked item.
IIf the item is unchecked, the item is removed from the index using Array.splice().
Call setChecked() with updated array value.
// Add/Remove checked item from list
const handleCheck = (event) => {
  var updatedList = [...checked];
  if (event.target.checked) {
    updatedList = [...checked, event.target.value];
  } else {
    updatedList.splice(checked.indexOf(event.target.value), 1);
  }
  setChecked(updatedList);
};
Next, we add the function to trigger for the onChange of checkbox input element.
We will assign different classNames for checked and unchecked items. We declare a JS function that returns string value based on whether the item is included in the checked array.
// Return classes based on whether item is checked
const isChecked = (item) =>
   checked.includes(item) ? "checked-item" : "not-checked-item";
Next, we will use the isChecked() function to determine the className of the <span></span> containing the item name.
<span className={isChecked(item)}>{item}</span>
We will add a strike-through text effect by including CSS styles for className “checked-item” in styles.css.
.checked-item {
  text-decoration: line-through;
}
6. Generate string with checked item names
The checkedItems() JS function is declared to generate a string of checked items in the format of “item1, item2, item3, …” or return an empty string if no items are checked.
// Generate string of checked items
var checkedItems = checked.length
    ? checked.reduce((total, item) => {
        return total + ", " + item;
      })
    : "";
7. Display the checked item names
Finally, to display the string of checked items, we will include checkedItems variable in the JSX code returned by the App component.


 for Array of objects")
