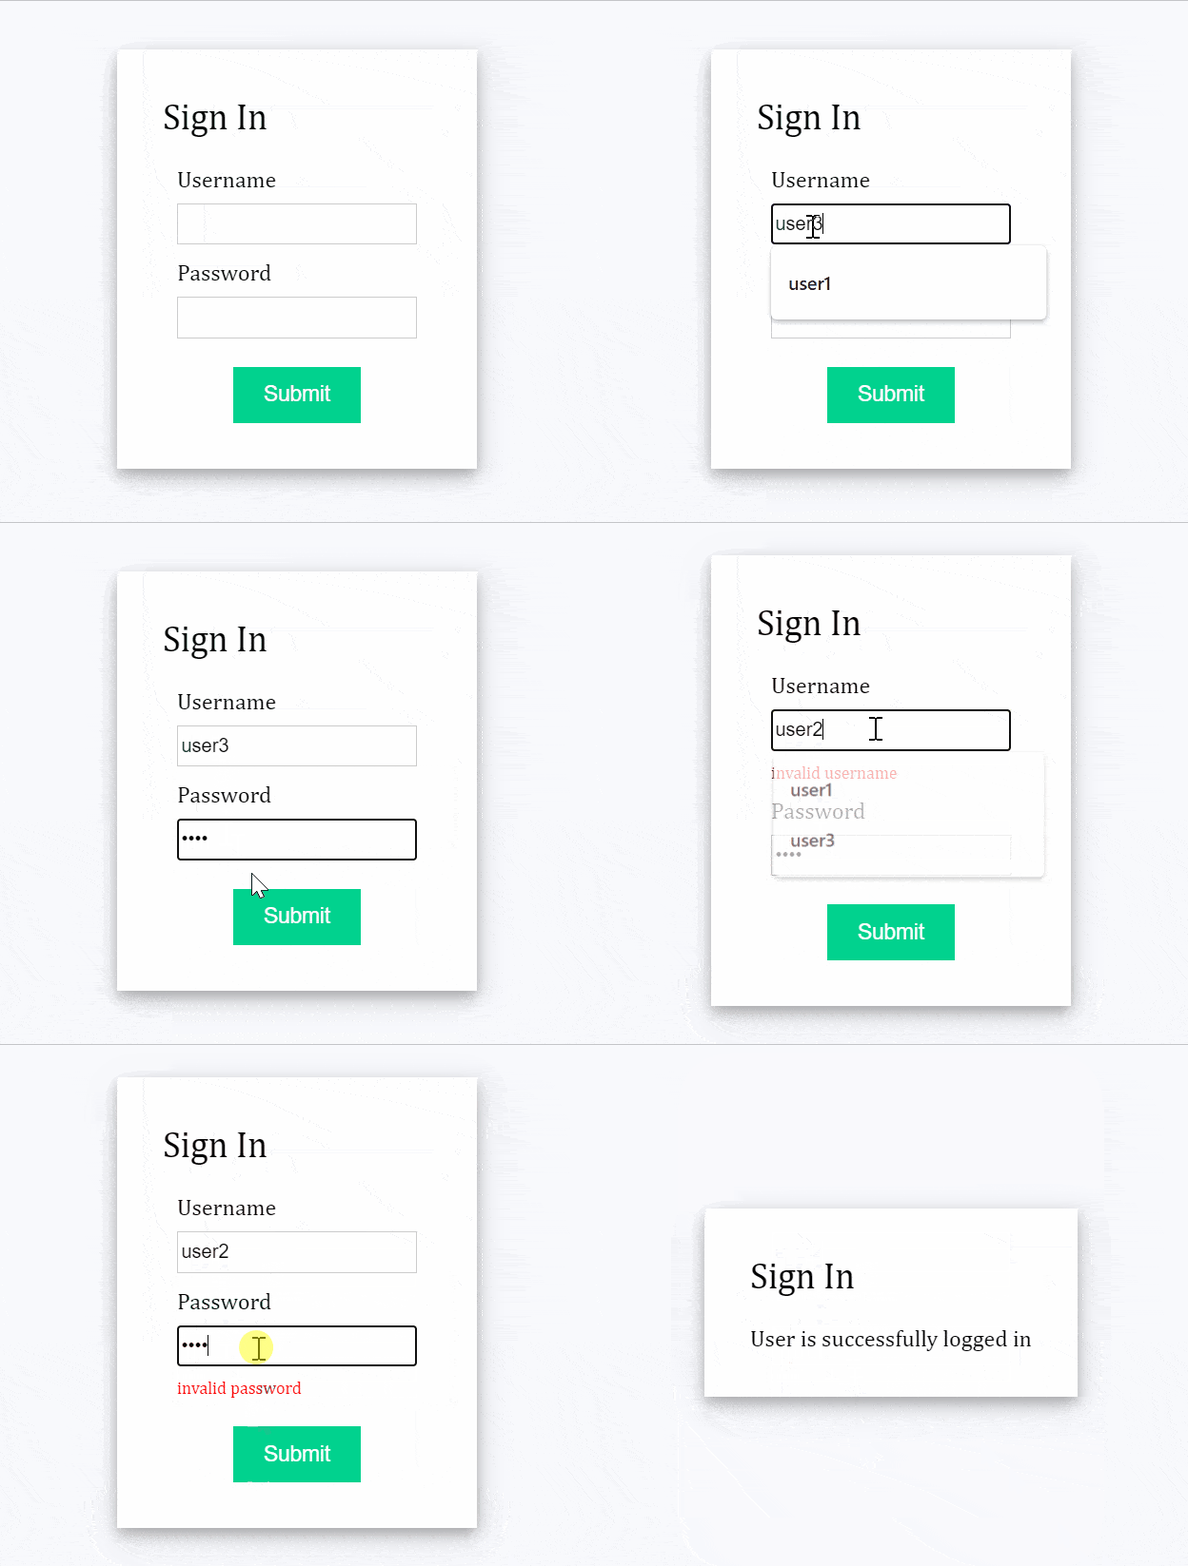
In this article, we will learn how to create a login form using React JS with form validation and error messages. The list of functionalities that we will build is as follows:
- Display the login form with username, password, and submit button on the screen.
- Users can input the values on the form.
- Validate the username and password entered by the user.
- Display an error message when the login fails.
- Show a success message when login is successful.

1. Declare React States for error messages and isSubmitted
We will declare two React states as follows:
- errorMessages: Store an object with the name of the field and the associated error message.
- isSubmitted: boolean value to indicate if the form is successfully submitted or not.
const [errorMessages, setErrorMessages] = useState({});
const [isSubmitted, setIsSubmitted] = useState(false);
2. JS function which generates JSX code for the error message
The renderErrorMessage function returns JSX code for displaying the error message associated with the field name.
// Generate JSX code for error message
const renderErrorMessage = (name) =>
  name === errorMessages.name && (
    <div className="error">{errorMessages.message}</div>
  );
3. JSX code for login form
We will add JSX code for the HTML form with input type=”text” for both user name and password along with input type=”submit” to allow users to submit the form.
Additionally, we will also display error messages below every form input element.
// JSX code for login form
const renderForm = (
   <div className="form">
     <form>
       <div className="input-container">
         <label>Username </label>
         <input type="text" name="uname" required />
         {renderErrorMessage("uname")}
       </div>
       <div className="input-container">
         <label>Password </label>
         <input type="password" name="pass" required />
         {renderErrorMessage("pass")}
       </div>
       <div className="button-container">
         <input type="submit" />
       </div>
     </form>
   </div>
);
4. Add function to handle form submit
To achieve login functionality, we need to create a JS function to handle form submission with validations. The handleSubmit() function accesses the event object of the form element, event.preventDefault() code avoids default form submit action which includes reloading of the page.
const handleSubmit = (event) => {
  // Prevent page reload
  event.preventDefault();
};
By assigning handleSubmit() function to onSubmit property of the form, the handleSubmit() is triggered each time the button/input of type=”submit” is clicked.
<form onSubmit={handleSubmit}>5. Validate form input with user details
Implementation of login functionality in the form requires declaring JS constants with all the correct user details. The following steps are needed to accomplish the functionality:
- Find expected user details by matching user names.
- If a match is not found then add the error message “invalid username“
- else validate the password, show the error message “invalid password” if validation fails.
- setIsSubmitted(true) if all validations pass.
// User Login info
  const database = [
  {
    username: "user1",
    password: "pass1"
  },
  {
    username: "user2",
    password: "pass2"
  }
];

const errors = {
  uname: "invalid username",
  pass: "invalid password"
};

const handleSubmit = (event) => {
  //Prevent page reload
  event.preventDefault();

  var { uname, pass } = document.forms[0];

  // Find user login info
  const userData = database.find((user) => user.username === uname.value);

  // Compare user info
  if (userData) {
    if (userData.password !== pass.value) {
      // Invalid password
      setErrorMessages({ name: "pass", message: errors.pass });
    } else {
      setIsSubmitted(true);
    }
  } else {
    // Username not found
    setErrorMessages({ name: "uname", message: errors.uname });
  }
};
6. Show success message after submit
We will add conditional rending in React JS based on the isSubmitted state value.
- If isSubmitted=true, show message “User is successfully logged in”.
- Else isSubmitted=false, display the login form.
<div className="login-form">
  <div className="title">Sign In</div>
  {isSubmitted ? <div>User is successfully logged in</div> : renderForm}
</div>
7. Securing the login form with HTTPS
The login form of the production application must be secured with HTTPS to send the login credentials through REST api. Unlike HTTP requests, HTTPS adds a layer of encryption on the login credentials which is passed through the server. Hence, sensitive data such as password and username cannot be eavesdropped by a third party hacker. Learn more about enabling HTTPS from web.dev/enable-https/ .
Final Solution Code
App.js
import React, { useState } from "react";
import ReactDOM from "react-dom";

import "./styles.css";

function App() {
  // React States
  const [errorMessages, setErrorMessages] = useState({});
  const [isSubmitted, setIsSubmitted] = useState(false);

  // User Login info
  const database = [
    {
      username: "user1",
      password: "pass1"
    },
    {
      username: "user2",
      password: "pass2"
    }
  ];

  const errors = {
    uname: "invalid username",
    pass: "invalid password"
  };

  const handleSubmit = (event) => {
    //Prevent page reload
    event.preventDefault();

    var { uname, pass } = document.forms[0];

    // Find user login info
    const userData = database.find((user) => user.username === uname.value);

    // Compare user info
    if (userData) {
      if (userData.password !== pass.value) {
        // Invalid password
        setErrorMessages({ name: "pass", message: errors.pass });
      } else {
        setIsSubmitted(true);
      }
    } else {
      // Username not found
      setErrorMessages({ name: "uname", message: errors.uname });
    }
  };

  // Generate JSX code for error message
  const renderErrorMessage = (name) =>
    name === errorMessages.name && (
      <div className="error">{errorMessages.message}</div>
    );

  // JSX code for login form
  const renderForm = (
    <div className="form">
      <form onSubmit={handleSubmit}>
        <div className="input-container">
          <label>Username </label>
          <input type="text" name="uname" required />
          {renderErrorMessage("uname")}
        </div>
        <div className="input-container">
          <label>Password </label>
          <input type="password" name="pass" required />
          {renderErrorMessage("pass")}
        </div>
        <div className="button-container">
          <input type="submit" />
        </div>
      </form>
    </div>
  );

  return (
    <div className="app">
      <div className="login-form">
        <div className="title">Sign In</div>
        {isSubmitted ? <div>User is successfully logged in</div> : renderForm}
      </div>
    </div>
  );
}

export default App;
styles.css
.app {
  font-family: sans-serif;
  display: flex;
  align-items: center;
  justify-content: center;
  flex-direction: column;
  gap: 20px;
  height: 100vh;
  font-family: Cambria, Cochin, Georgia, Times, "Times New Roman", serif;
  background-color: #f8f9fd;
}

input[type="text"],
input[type="password"] {
  height: 25px;
  border: 1px solid rgba(0, 0, 0, 0.2);
}

input[type="submit"] {
  margin-top: 10px;
  cursor: pointer;
  font-size: 15px;
  background: #01d28e;
  border: 1px solid #01d28e;
  color: #fff;
  padding: 10px 20px;
}

input[type="submit"]:hover {
  background: #6cf0c2;
}

.button-container {
  display: flex;
  justify-content: center;
}

.login-form {
  background-color: white;
  padding: 2rem;
  box-shadow: 0 4px 8px 0 rgba(0, 0, 0, 0.2), 0 6px 20px 0 rgba(0, 0, 0, 0.19);
}

.list-container {
  display: flex;
}

.error {
  color: red;
  font-size: 12px;
}

.title {
  font-size: 25px;
  margin-bottom: 20px;
}

.input-container {
  display: flex;
  flex-direction: column;
  gap: 8px;
  margin: 10px;
}


